DAFNE Interactions Display
![]()
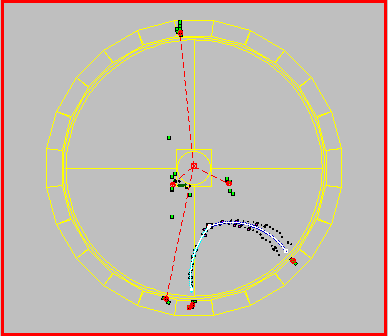
here are some pictures of selected events in color and black&white .
![]() "Infandum, regina, iubes renovare dolorem ..."
(Vir. Aen. II,5)
"Infandum, regina, iubes renovare dolorem ..."
(Vir. Aen. II,5)
This page is preliminary and still under construction !
DIDONE is the first version of the KLOE detector event display. At the present stage of the KLOE experiment DIDONE is conceived as a tool for testing and developing the reconstruction algorithms.
In practice it interfaces the content of several YBOS banks (see KLOE Note #137) created by the reconstruction program with the KLOE database (see KLOE Memo #45 ), and the "o" graphical package .
In addition DIDONE has the capability of invoking interactively Analysis Control (A_C) , the reconstruction program driver, so that one single event can be redisplayed at will according to the favorite algorithm of the user. In this case DIDONE reads the YBOS banks from a memory location which is shared with A_C, instead of reading them from established files.
DIDONE follows a first demo version of an event display Installed by W.Grandegger and announced in the previous display meetings .
At LNF DIDONE is presently supported on both HP-UNIX and DEC-OSF platforms and aligned with the KLOE offline standards. However, for different reasons (old operating system, uninstalled libraries, etc), DIDONE can be presently used only from hpkloe01 , and kloe01 , and kloedaq .
To run it type:
     $HOME> setup didone
     $HOME/didone> DIDONE
If you do not have a color screen use
"setup -f bw didone" instead.
When invoked for the first time the setup command creates a directory $HOME/didone to contain several specific links and files; the display main window should always be started from this directory. If such directory already exists the setup command only defines the environment variables needed by DIDONE.
The development version is also accessible with the standard convention:
     $HOME> setup didone development
     $HOME/didone> DIDONE
![]()
DIDONE can be used from LNF via afs . It also can be
copied in each homelab via anonymous ftp .
To do it the "o" package libraries, which are shared libraries, should be
installed locally. This can be done
using the /dist/offline/HP-UX(OSF1)/opacs_v1.tar.gz
tar file from hpkloe01.
We are still testing the procedure. Please let me known any
existing problem.
The display main window contains the following motif-like buttons, each opening a menu of possible actions:

The File menu contains the Open File, Print, Commands, Stances and Stop commands. "Commands" raises up a palette which gives the possibility to drive the "o" package interactively. This possibility is dedicated to developers or particularly expert users. "Instances" raises up a palette which gives the possibility to dump the content of a given YBOS banks.
The Event menu contains the Next Event, Select Event, Auto Next and Redisplay commands. Events can be selected from their event number. However the event selection can be done only in increasing order. To select events previously displayed it is necessary to re-open the file.
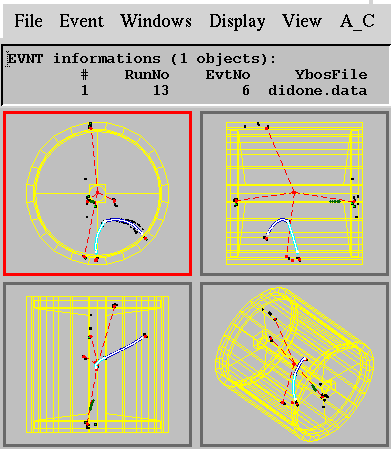
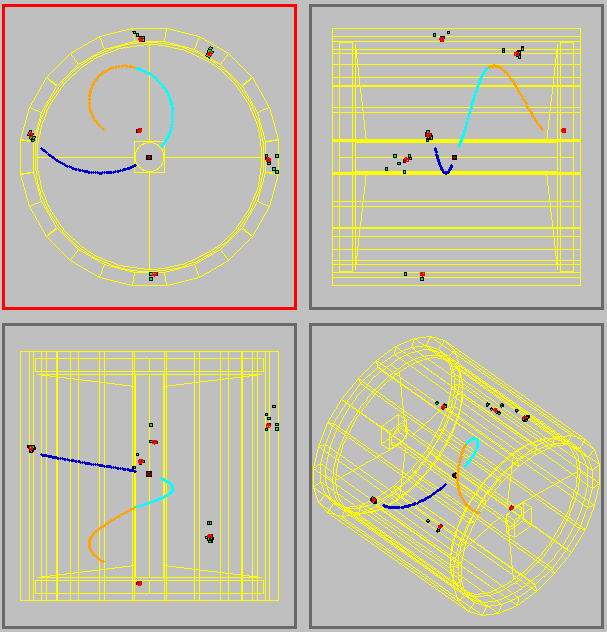
The Windows menu contains the choice of the window format. At present there are only two possibilities: the single window and the 2x2 windows format The target window is defined as the one in which all the displaying commands are effective. For those having a color screen, it is the one bordered in red. In the 2x2 format it is by default the top-left one, and can be changed using the "Next Window is Target" command.
The Display menu contains the list of the objects to be displayed or hidden from the screen. These objects can be changed by the user in a permanent way by pushing the approriate (Yes/No) buttons. By default DIDONE displays the Drift Chamber (DC) wire hits at z=0, with a radius determined from the drift time measurement, the reconstructed tracks, the reconstructed charged vertices, the reconstructed Electro-magnetic Calorimeter (EmC) elements, the reconstructed EmC clusters, the reconstructed neutral vertices and the photons. In addition the space hits from the Monte Carlo simulation are also plotted.
The View menu contains the list of views of the detector: Front, Side, Top and 3-Dimensional. It is also possible to switch from the grey background to the black background for esthetic purposes. The color code has not been optimized yet, especially for what concerns slides. Suggestions are welcomed.
The A_C menu contains the commands used to invoke an A_C executable, which is defined by the environment variable VISAC,e.g.(on kloe01):
     $HOME/didone> echo $VISAC
     $HOME/didone> /kloe/soft/onl/Vis/v1/OSF1/ac_shm.exe
The default $VISAC is defined with the "setup didone" command. It contains the following modules: ANDISI, ANDISO, DCALIB, DCONVR, DCPRAP, ATFMOD, DCVXAR, CLUREC and NEVMOD with the TRK part from development. The first two modules are needed to work in the shared memory mode. Of course the user can use his/her favorite version of A_C by redefining VISAC (setenv VISAC my_AC.exe). An example of the build .uic file can be found in /u1/passalak/didone/build_didone.uic on the LNF machines.
There are two ways of using A_C together with DIDONE: one in which the display is slave to A_C (the "online" way started with the command A_C -> Vis in the A_C menu), and another in which A_C is slave to the display (the "offline" way started with the command "Vis->A_C->Vis" command). In the second case the command Reprocess permits to re-process the same events using all the (almost) infinite facilities of A_C. Of course offliners are recommended to use the "Vis->A_C->Vis" mode. Also remember that DIDONE uses some banks which -at the moment- are not kept in the A_C standard output. Therefore use the "output select kept_banks 'bank names'" command inside A_C (e.g. this happens for the CWRK bank).
The Help menu contains a long list of commands. However, despite of the name, they are dedicated to the developer or the expert user and will not be described here.
![]()
Dealing with many informations to be displayed a code of symbols and colors has been established. The main ones are:
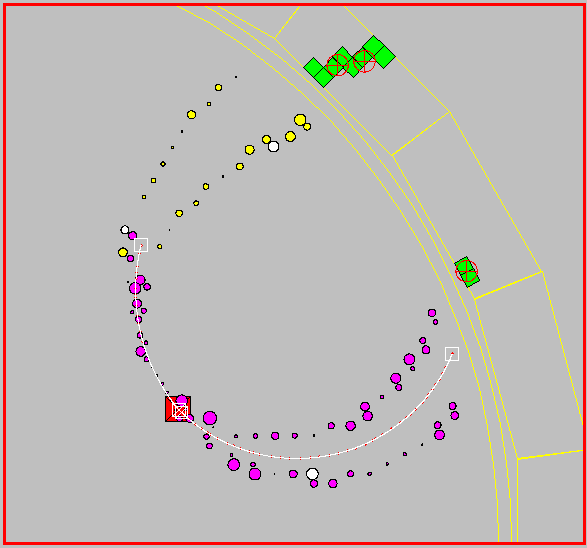
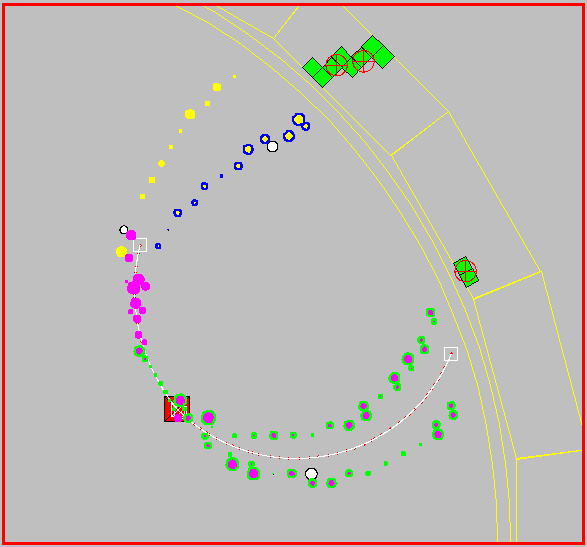
MC DC hits are drawn as points of different colors. The color indicates the nature of the particle: pions are blue, muons are red, electrons are green. The light/dark color indicates the charge: positive pions are dark blue, negative pions are light blue, etc... Here is an example.
Reconstructed tracks are drawn as white lines between the first and the last points of the fit. The first point is surrounded by an empty square with white diagonals and the last point by an empty square without diagonals.
Charged Vertices are drawn as points surrounded by red boxes with black diagonals. Neutral Vertices are drawn as points surrounded by empty boxes with red diagonals.
DC wire hits are drawn as solid circles. The color of the circle is magenta if the hit is associated with a 3-D pattern candidate, yellow if associated to a 1-D candidate (in either one of the two views) and white if the hit was rejected by the pattern recognition. Here is an example.
Wire belonging to the same pattern candidate are shown using the command "Show Pattern Candidates" in the Display menu. A colored thick line is then superimposed to the circles according to the results of the pattern algorithm. The result applied to the previous example looks like this.
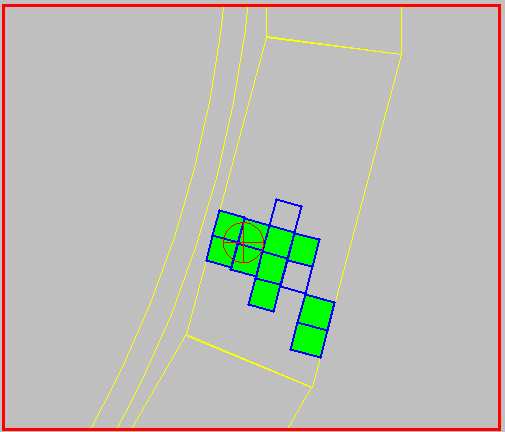
The EmC elements are drawn as green boxes while the clusters are represented by red circles with a cross inside. MC EmC elements are drawn as empty blue boxes. They can be superimposed to the reconstructed elements as in this example.
DIDONE uses the mouse for several actions; the most relevant are the following: zoom a part of the screen, retrieve informations on a given object, rotate the 3-D picture.
To zoom a part of the screen use control-shift-leftmost mouse button and select the portion of the screen to be zoomed. To go back click the rightmost button and select "Back" from the menu which is popped up.
To retrieve informations on a given object just click on it with the the leftmost button. The object will be highlighted and a new window will be opened with the dump of the informations available on the object. To go back click on an empty region of the screen.
To rotate the 3-D picture first click the rightmost button and select "Rotate" in the menu. Then keeping the Control key and the leftmost button pushed move the cursor on the screen. The symbol of the cursor will change and 3-D picture will follow it.
![]()
The present release of DIDONE is the first one. Many features have to be optimized and new features added to improve DIDONE performances. This will be much easier with a constructive feedback from the users. Please do not hesitate to contact me for suggestions, comments questions, etc.. A preliminary list of upgrades contains a better geometrical description of the detector, adding more links from MC to reconstructed objects, solving bugs (!), etc..
![]()
[ KLOE Online ] [ KLOE Offline ] [ KLOE Event Display ] [ Index ] [ Top ]
Last updated 18 May 1995
Suggestions, comments and questions ? Please contact: